Learner Engagement Hub
The learner engagement hub allows you to easily manage learner communication and engagement
To get started, click the Engagement tab at the top of your portal. You will have access to a few different sections in your left panel:
- Invite to Schedule (Allows you to send custom invitations to your learners reminding them to book their next simulation)
- Email Management
- Portal Messaging (Allows you to add custom messaging for your learners to the Mursion portal)
Invite to Schedule
This tab allows you to easily email your learners and add learners to teams.
Email Learners
The first tab, Email Learners, allows you to send custom email invitations to your learners. This page will show your active projects. Click Create Invite to schedule a new invitation.
Creating an Invitation
- Click Create Invite next to the project you wish to send an invite for.

- Select the teams you wish to send the invitation to. Note, you'll be able to limit which learners receive this invite in a later step.
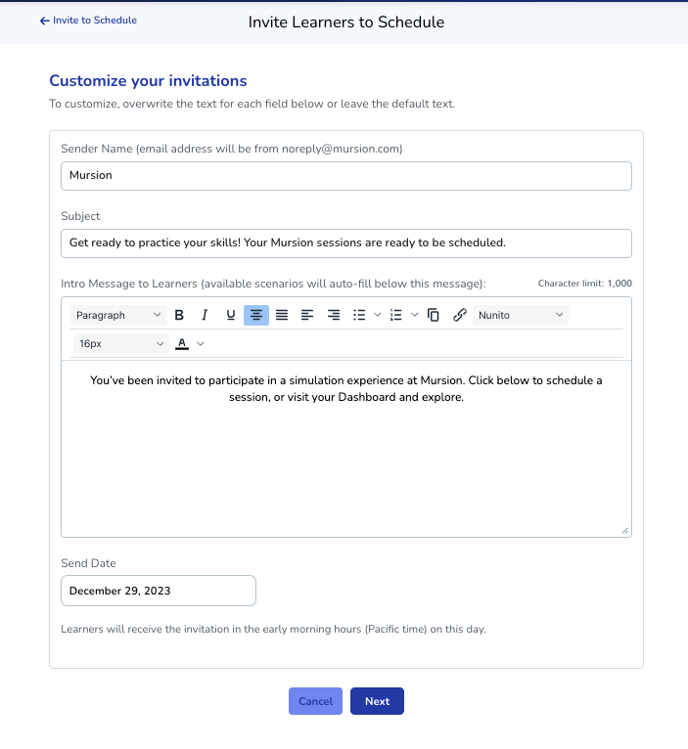
- Review your invitation. You can customize the sender name, email subject, and intro message for the invite. In addition to this information, the learner will receive a list of eligible scenarios with links to schedule each scenario.
- At the bottom, indicate the date you would like this email to go out. Note, these emails go out in the very early morning of the selected date.
- When you are happy with your customizations, click Next
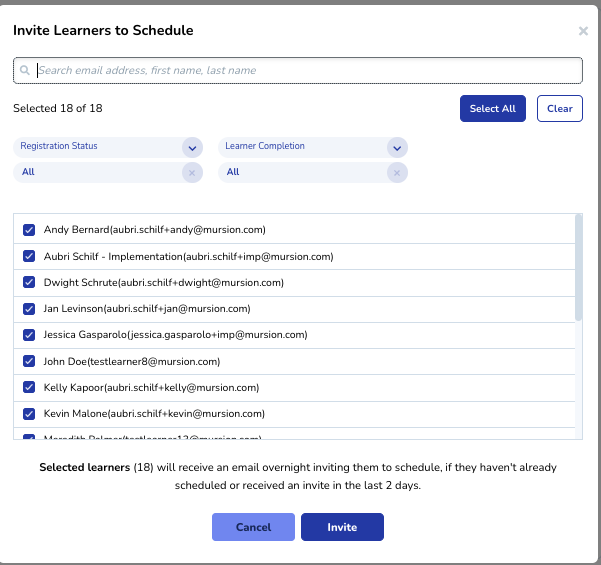
- A window will open allowing you to confirm which learners you wish to receive the invitation. By default, all learners on the team will be selected. You can filter this list by Registration Status or the number of sessions a learner has already completed. You can also search to include or exclude specific learners by name or email address.
Note: When using the session filter, avoid selecting "Not yet scheduled" or "Not yet completed" together with a "Completed" option - this may return inaccurate results and represents a conflicting filter choice.
- Once you are happy with the list of learners who will receive the invitation, click Invite.
- If you need to cancel the invitation, you can do so up until the date it is scheduled to send. See the next section for details on how to do this.
You can review previously sent invitations or edit a scheduled invitation from this page. To do so, click View Invitations next to the project you wish to review the invite for.
This will show all previously sent and upcoming scheduled invitations, including the team that was selected, the subject, intro message, number of learners, Sendfer Name, and who created the invitation.
For upcoming invitations, you can click Cancel to cancel the invitation.
For previously sent invitations, you can see details on how many learners opened, clicked, and ultimately scheduled their session because of the email. 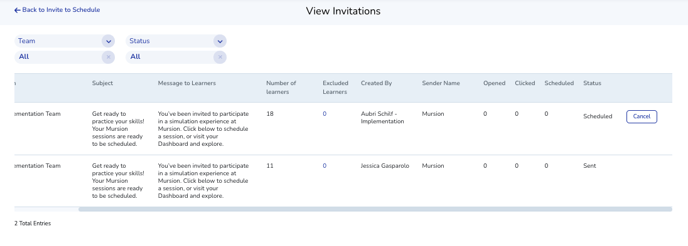
Invite to Team
The other option under the Invite to Schedule section allows you to easily manage team assignments.
This tab will show all of the teams you currently have configured within your portal. You can click Add Learners to easily add new learners to the team. You can use this option to add existing Mursion users to a new team or to invite brand-new users to Mursion.
Copy Invite Link allows you to copy a unique link that you can share with learners. This link when clicked will automatically add learners to the team you provide the link for. Note - learners must already exist within the portal or you must have single-sign-on configured to automatically create the learner.
It is important that you ensure only learners who shold be added to the team are provided the link. If the link is provided to the wrong learner, that learner will be added to the team and will have access to the scenarios assigned to that team.
Email Management
Email Analytics
This table provides details on the open and acted on rates for the emails generated from the Mursion portal. 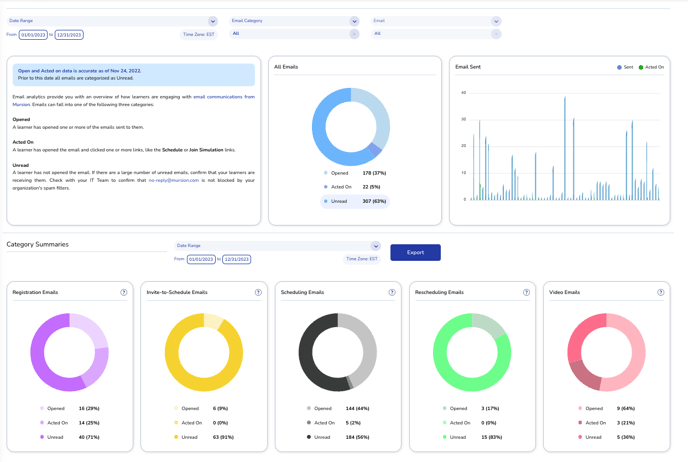
The top section showcases the overall number of emails sent from the portal that meet the selected filters (date range, email category, and specific email). This also includes a chart that showcases emails sent over time.
The bottom section shows the same information broken down by email category, as well as providing an export option. The following email categories are reported on:
- Registration Emails (Automated registration and password reset emails).
- Invite-to-Schedule Emails (Invite to schedule emails that are generated by someone in the portal)
- Scheduling Emails (Session confirmation and session reminder emails generated by the portal)
- Rescheduling Emails (Emails asking the learner to reschedule their session after canceling or missing it)
- Video Emails (Emails notifying the learner that their recording and/or report are available for review)
For each chart, the emails are separated by the status of the email:
- Opened - This indicates that the email was opened by the learner
- Acted On - This indicates that the learner clicked on a link within the portal. Note, emails that are acted on will count towards both the Opened and the Acted On percentages within the charts.
- Unread - This indicates that the learner did not open the email.
Email Settings
This section allows you customize the automated emails sent from the Mursion portal. 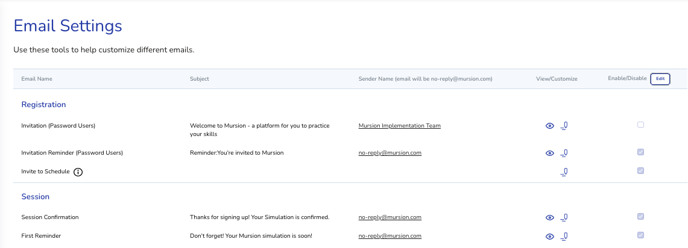
Previewing the Email
To view a sample of a specific email, click the![]() icon next to the email. This will allow you to see a sample copy of the email learners would receive with any applicable customizations.
icon next to the email. This will allow you to see a sample copy of the email learners would receive with any applicable customizations.
Editing the Email
To edit the email, click the ![]() icon next to the email. This will allow you to customize the following for each email:
icon next to the email. This will allow you to customize the following for each email:
- Sender Name
- Subject
- Intro Message to Learners
After updating the customizable fields, click Save to save your changes.
Updating the Sender Name on your emails to something leaners recognize increases the open rate for your email!
Disabling the Email
You can also disable an email entirely from being sent.
- To do so, click the Edit button at the top right of the page.
- Uncheck any emails you do not want learners to receive.
- Then, click Save.
Be sure you know which emails you are disabling and ensuring that your learners will have another way to gather any pertinent information. If disabled, your learners will never receive that email.
Portal Messaging
This section allows you to set up custom messages that will appear throughout the Mursion portal to your learners. This is a great place to include information that is important for your learners to know about how Mursion simulations fit into your Learning and Development plan or provide instructions on when and how they should be completing their Mursion simulations.
To get started, enter a Personalized Messaging Header. This header will appear anywhere you have custom messages letting the learner know where this message is coming from.

Then, you can add custom messages for each of the following places within the learner portal:
- Learner Dashboard

- Scheduling Page

- Scenario Page (Scenario Messages will appear on the scenario page within the portal, as well as within the Mursion Magic Info pane)
